The way shaders allow you to communicate the rendering properties of your material to their lighting model is via a surface output. It is basically a wrapper around all the parameters that the current lighting model needs. It should not surprise you that different lighting models have different surface output structs. The following table shows the three main output structs used in Unity 5 and how they can be used:
The SurfaceOutput struct has the following properties:
fixed3 Albedo;: This is the diffuse color of the material
fixed3 Normal;: This is the tangent space normal, if written
fixed3 Emission;: This is the color of the light emitted by the material (this property is declared as half3 in the Standard Shaders)
fixed Alpha;: This is the transparency of the material
half Specular;: This is the specular power from 0 to 1
fixed Gloss;: This is the specular intensity
The SurfaceOutputStandard struct has the following properties:
fixed3 Albedo;: This is the base color of the material(whether it’s diffuse or specular)
fixed3 Normal;
half3 Emission;: This property is declared as half3, while it was defined as fixed in SurfaceOutput
fixed Alpha;
half Occlusion;: This is the occlusion (default 1)
half Smoothness;: This is the smoothness (0 = rough, 1 = smooth)
half Metallic;: 0 = non-metal, 1 = metal
The SurfaceOutputStandardSpecular struct has the following properties:
fixed3 Albedo;.
fixed3 Normal;.
half3 Emission;.
fixed Alpha;.
half Occlusion;.
half Smoothness;.
fixed3 Specular;: This is the specular color. This is very different from the Specular property in SurfaceOutput as it allows specifying a color rather than a single value.
Using a Surface Shader correctly is a matter of initializing the surface output with the correct values.
There are two ways to delete a project in the Unity’s project
wizard. The first one is simply deleting, renaming or moving the
directory directly from its location. The project wizard is smart enough
and this is the recommended option.
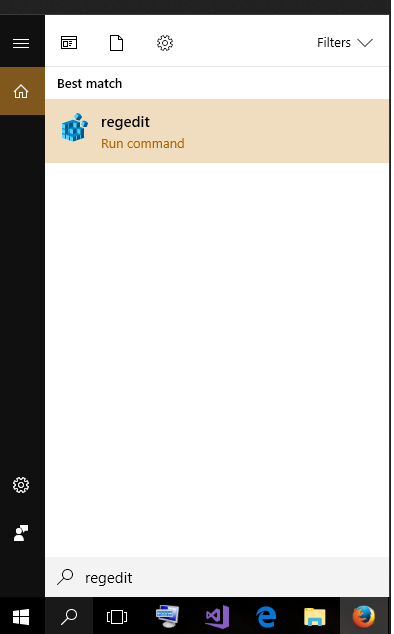
The second one requires administrator privileges and deleting the
registry entries associated with the projects we want to get rid of from
the wizard’s list without deleting, moving or renaming the directories. 1 - Go to Windows registry (run regedit.exe).
2 - In the Windows registry, go to HKEY_CURRENT_USER/Software/Unity Technologies/Unity Editor 5.x/
4- Find the entries which names begin with “RecentlyUsedProjectPaths-“. They’re numbered. If you click on the entry you can see your project path. 5- Select and delete the entries you want to get rid of.
Reference: This post is updated version of the solution from http://jorge.palacios.co/clean-unitys-project-wizard-in-unity-4-x/
Why is it colder at the poles and hotter on the equator? This question,
which seems completely unrelated to shaders, is actually fundamental to
understand how lighting models work. As explained in the previous part
of this tutorial, surface shaders use a mathematical model to predict
how light will reflect on triangles. Generally speaking, Unity
supports two types of shading techniques, one for matte and one for
specular materials. The former ones are perfect for opaque surfaces,
while the latter ones simulate objects which reflections. The Maths
behind these lighting models can get quite complicated, but
understanding how they work is essential if you want to create your own,
custom lighting effect. Up to Unity4.x, the default diffuse lighting
model was based on the Lambertian reflectance.
Diffuse surfaces: the Lambertian model
Going back to the initial question, the
reason why the poles are colder, is because they receive less sunlight
compared to the equator. This happens because of their relative
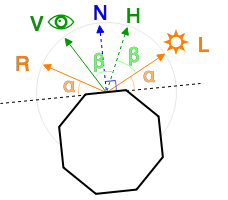
inclination from the sun. The following diagram shows how the polar
edges of the octagon receive sensibly less light compared the frontal
one:
The blue line represents the normal of
the face, which is an orthogonal vector of unit length. The orange one
represents the direction of the light. The amount of light on the fade depends on the angle between the normal and the light direction . In the Lambertian model, this quantity is equal to the vertical component of the incident light ray:
Which can be expressed as:
where is the length of (which is one by definition) and is the angle between and . This operation, in vector algebra, is known as dot product as was briefly introduced in the previous post. Formally, it is defined as the follow:
and is available in Cg / HLSL using the function
dot. It returns a number ranging from -1 to +1 which is zero when the vectors are orthogonal, and 1
when they are parallel. We’ll use it as a multiplier coefficient to
determine how much light triangles receive from a light source.
The Lambertian shader
We now have all the necessary background
to understand how a Lambertian model can be implemented in a shader. Cg
/ HLSL allows to replace the standard Lambertian model with a custom
function. In line 8, using
SimpleLambert in the directive
#pragma surface forces the shader to search for a function called
LightingSimpleLambert:
Lines 19-25 shows how the Lambertian model can be naively re-implemented in a surface shader.
NdotL represents the coefficient of intensity, which is then multiplied to the colour of the light. The parameters
atten is
used to modulate the intensity of the light. The reason why it is
multiplied by two is… a trick initially used by Unity3D to simulate
certain effects. As explained by Aras Pranckevičius,
it has been kept in Unity4 for backward compatibility. This has been
finally fixed in Unity5, so if you’re reimplementing a Lambertian model
for Unity5, just multiply by one.
Understanding how the standard lighting
model works is an essential step if we want to change it. Many
alternative shading techniques, in fact, still use the Lambertian model
as their first step.
Toon shading
One of the most used styles in games lately is the toon shading (also known as cel shading).
It’s a non photorealistic rendering style which changes the way light
reflects on a model to give the illusion it has been hand drawn. To
implement this style, we need to replace the standard lighting model
used so far with a custom one. The most common technique to achieve this
style is to use an additional texture, called
_RampTex in the shader below.
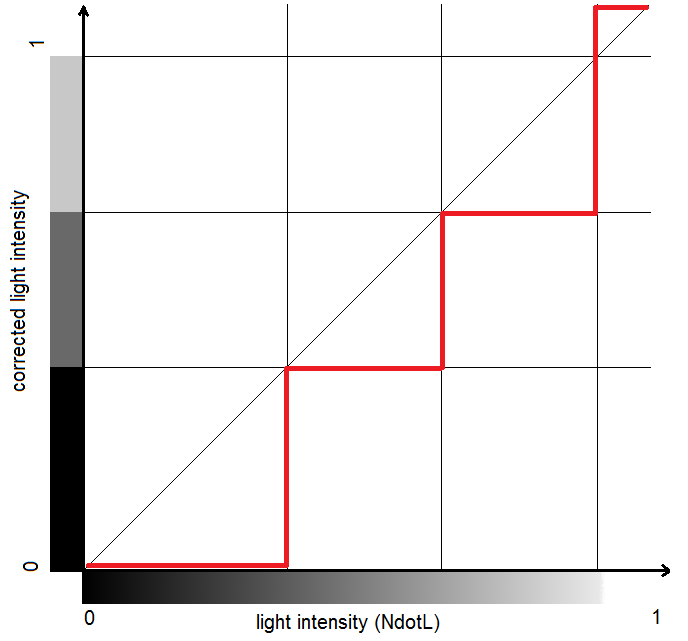
The
LightingToon model calculates the Lambertian coefficient of intensity
NdotL and
uses the ramp texture to re-map it onto a different set of values. In
this case, to restrict the intensity to four values only. Different ramp
textures will achieve slightly different variants of toon shading.
Specular surfaces: the Blinn-Phong model
The Lambertian
model cannot simulate materials which have specular reflections. For
them, another technique is necessary; Unity4.x adopts the Blinn-Phong model. Rather than calculating the dot product between the normal and the light direction , it uses which is the vector halfway between and the view direction :
The quantity is then processed further using the and settings. If you need more information on how Unity calculates its lighting models, you can download the source for its built-in shaders. Both the Lambertian and Blinn-Phong surface functions are calculated in the file Lighting.cginc. In Unity5 they’re available as Legacy shaders.
Physically Based Rendering in Unity5
As mentioned at the beginning of this
post, Uniy4.x was using the Lambertian lighting model as its default
shader. Unity5 has changed that, introducing the Physically Based Rendering
(PBR). The name sounds very intriguing, but is nothing more then
another lighting model. Compared to the Lambertian reflectange,
PBR provides a more realistic interaction between lights and objects.
The term physically refers to the fact that PBR takes into
account physical properties of materials, such as conservation of energy
and light scatter. Unity5 provides two different ways for artists and
developers to create their PBR materials: the Metallic workflow and the Specular workflow.
In the first one, the way a material reflects light depends on how
metallic it is. A cheap explanation is that light is an electromagnetic
wave, and it behaves differently when in contact with a conductor or an insulator.
In the Specular workflow, a specular map is provided instead. Despite
being presented as two different things, Metallic and Specular
materials are actually different ways to initialise the same shader; Marmoset
has a very well done tutorial in which it shows how the same
material can be created both with the Metallic and Specular workflows.
Having two workflows for the same thing is one of the main sources of
misunderstanding when approaching Unity5 shaders for the first time. Joe Wilson
made an incredibly clear tutorial oriented to artists: it’s a good
starting point if you want to learn how to use PBR to create highly
realistic materials. If you need some more technical information,
there’s a very well done primer on PBR on the Unity5 blog.
The name of Unity5’s new lighting model is, simply,
Standard.
The reason behind this name is that PBR is now the default material for
every new object created in Unity3D. Moreover, every new shader file
created is automatically configured as a PBR surface shader:
1
2
3
4
5
6
7
8
9
10
11
12
13
14
15
16
17
18
19
20
21
22
23
24
25
26
27
28
29
30
31
32
33
34
35
36
37
38
39
40
41
Shader"Custom/NewShader"{
Properties{
_Color("Color",Color)=(1,1,1,1)
_MainTex("Albedo (RGB)",2D)="white"{}
_Glossiness("Smoothness",Range(0,1))=0.5
_Metallic("Metallic",Range(0,1))=0.0
}
SubShader{
Tags{"RenderType"="Opaque"}
LOD200
CGPROGRAM
// Physically based Standard lighting model, and enable shadows on all light types
#pragma surface surf Standard fullforwardshadows
// Use shader model 3.0 target, to get nicer looking lighting
#pragma target 3.0
sampler2D _MainTex;
structInput{
float2 uv_MainTex;
};
half _Glossiness;
half _Metallic;
fixed4 _Color;
voidsurf(Input IN,inout SurfaceOutputStandardo){
// Albedo comes from a texture tinted by color
fixed4c=tex2D(_MainTex,IN.uv_MainTex)*_Color;
o.Albedo=c.rgb;
// Metallic and smoothness come from slider variables
o.Metallic=_Metallic;
o.Smoothness=_Glossiness;
o.Alpha=c.a;
}
ENDCG
}
FallBack"Diffuse"
}
Line 14 tells Unity3D that this surface shader will use the PBR lighting model. Line 17 signals
that advanced features are being used in this shader, hence it won’t be
able to run on outdated hardwares. For the same reason,
SurfaceOutput can’t be used with PBR;
SurfaceOutputStandard must be used instead.
PBR surface outputs
Along
Albedo,
Normal,
Emission and
Alpha, there are three new properties available in
SurfaceOutputStandard:
halfMetallic: how
metallic the object is. It’s usually either 0 or 1, but intermediate
values can be used for bizarre materials. It will determine how light
reflects on the material;
halfSmoothness: indicates how smooth the surface is, from 0 to 1;
halfOcclusion: indicates the amount of ambient occlusion.
If you want to use the Specular workflow, you should use
SurfaceOutputStandardSpecular which replaces
half Metallic with
float3 Specular. Note that while the Lambertian reflectance has a specular field which is
half, the specular property in PBR is a
float3. It corresponds to the RGB colour of the specularly reflected light.
Shading technique used in Unity
So far, four different shading
techniques have been introduced. To avoid confusion, you can refer
to the table below which indicates, in order: shading
technique, surface shader name, surface output structure name and the
name of the respective built-in shader.
Physically Based Rendering (Specular) StandardSpecular,
SurfaceOutputStandardSpecular
Standard (Specular setup)
The equations behind PBR are rather
complicated. If you are interested in understanding the Maths behind
it, both the Wikipedia page for Rendering equation and this article are good starting points.
If you imported the Unity3D package (which includes
the shader used in this tutorial), you’ll notice how the built-in
“Bumped Diffuse” shader yields a very different result compared to
its naive implementation “Simple Lambert”. This is because Unity3D’s
shader adds additional features, such as normal maps.
Conclusion
This post introduced custom
lighting models for surface shaders. The Lambertian and Blinn-Phong
models are briefly explained, with a real example of how they can be
changed to obtain different effects. It is important to notice that
purely diffuse materials don’t really exist in real life: even the most dull material
you can think of will have some specular reflection. Diffuse materials
were very common in the past, when calculating specular reflections
was too expensive.
The post also shows what physically
based rendering is, and how it can be used in Unity5. PBR shaders are
nothing more then surface shaders with a very advanced lighting model.


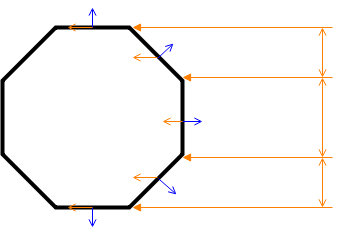
 on the fade depends on the angle between the normal
  and the light direction
  . In the Lambertian model, this quantity is equal to the vertical component of the incident light ray:
![\[I= \left \| L \right \| \, cos \alpha = cos \alpha\]](https://www.alanzucconi.com/wp-content/ql-cache/quicklatex.com-e49888b0f2b5c15d7a5765cdc5cd0946_l3.svg "Rendered by QuickLaTeX.com")
 is the length of
  is the angle between
 ![\[A \cdot B = \left \| A \right \| \, \left \| B \right \| \, cos \alpha\]](https://www.alanzucconi.com/wp-content/ql-cache/quicklatex.com-c24f181f3ce8adaef10c640afde35e0b_l3.svg "Rendered by QuickLaTeX.com")
 1
when they are parallel. We’ll use it as a multiplier coefficient to
determine how much light triangles receive from a light source.
1
when they are parallel. We’ll use it as a multiplier coefficient to
determine how much light triangles receive from a light source.
 which is the vector halfway between
  :
:
![\[\mathrm{Lambertian\,model:} \,\,\,\ I = N \cdot L\]](https://www.alanzucconi.com/wp-content/ql-cache/quicklatex.com-932735d63a92ddee6157ad2166cd9a2b_l3.svg "Rendered by QuickLaTeX.com")
![\[\mathrm{Blinn-Phong\,model:} \,\,\,\ I = \left ( N \cdot H \right )^{specular} \cdot gloss\]](https://www.alanzucconi.com/wp-content/ql-cache/quicklatex.com-19ce38f13f4028cb2ae31e0bb793c0e6_l3.svg "Rendered by QuickLaTeX.com")
![\[H = \frac{L+V}{\left| L +V\right|}\]](https://www.alanzucconi.com/wp-content/ql-cache/quicklatex.com-96e761213171348df98933bf5e460a2e_l3.svg "Rendered by QuickLaTeX.com")
 is then processed further using the
  and
and  settings. If you need more information on how Unity calculates its lighting models, you can download the source for its built-in shaders. Both the Lambertian and Blinn-Phong surface functions are calculated in the file Lighting.cginc. In Unity5 they’re available as Legacy shaders.
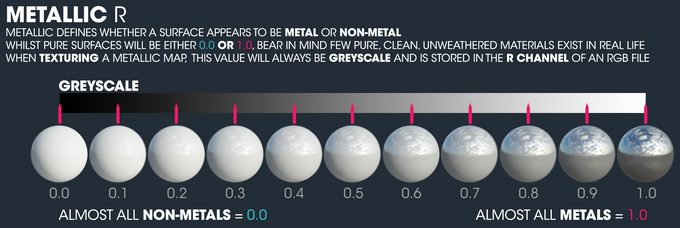

![\[I = N \cdot L\]](https://www.alanzucconi.com/wp-content/ql-cache/quicklatex.com-dd123fc00c1bf8350269b8692692efdb_l3.svg "Rendered by QuickLaTeX.com")
![\[I = \left ( N \cdot H \right )^{specular} \cdot gloss\]](https://www.alanzucconi.com/wp-content/ql-cache/quicklatex.com-66d2635e307989a062334515b5274059_l3.svg "Rendered by QuickLaTeX.com")